Google Analytics Code
on 01-27-2026 12:00 AM by SnapApp by BlueVector AI
1013
Overview
Google Analytics code is a tracking script provided by Google that allows you to collect and analyze user interaction data from your website or application. When implemented in SnapApp, this code helps monitor how users interact with your content and sends this data securely to Google Analytics servers for processing.
The processed data is presented as reports and dashboards that give insights into:
- How many users visit your application
- Which pages they view most often
- How long they stay on the site
- How they interact with different features
These insights help organizations improve user experience, optimize content, and make informed, data-driven decisions.
For more details, click here.
Table of Contents
- Understanding the Google Analytics Measurement ID
- Why the Measurement ID is Important
- Prerequisites
- Step-by-Step: Implementing Google Analytics in SnapApp
- Step 1: Access Global Settings
- Step 2: Locate the Google Analytics Section
- Step 3: Enter the Google Analytics Measurement ID
- Step 4: Save the Configuration
- What Data is Collected in SnapApp
- Dashboards and Insights
- Verification (Optional but Recommended)
Understanding the Google Analytics Measurement ID
The Measurement ID is a unique identifier generated by Google Analytics. It follows this format:
G-XXXXXXX
Why the Measurement ID is Important
- It tells Google Analytics where the data belongs
- It ensures data is collected for the correct website or application
- Without this ID, Google Analytics cannot track or store any interaction data
In SnapApp, the Measurement ID is required to enable analytics tracking.
Prerequisites
Before configuring Google Analytics in SnapApp, make sure:
- You have a Google Analytics account set up
- You have created a GA4 property for your website or application
- You follow the steps provided in Google Analytics
- You have copied the correct Measurement ID (
G-****) from Google Analytics
Step-by-Step: Implementing Google Analytics in SnapApp
Step 1: Access Global Settings
What to do:
- Log in to SnapApp.
- Open the application where you want to enable Google Analytics.
- Navigate to Global Settings.
Why this matters: Global Settings control application-wide configurations. Adding the Measurement ID here ensures that analytics tracking applies across the entire application.
Step 2: Locate the Google Analytics Section
What to do:
- Within Global Settings, scroll down to find the Google Analytics section.
- This section is located after the Application Settings section.
Why this matters: SnapApp separates analytics settings from other application configurations to avoid accidental changes and to keep tracking settings organized.
Step 3: Enter the Google Analytics Measurement ID
What to do:
- In the input field provided, paste your Measurement ID in the format:

Important notes:
- Ensure there are no extra spaces before or after the ID
- Double-check that the ID matches the correct Google Analytics property
Why this matters: Entering an incorrect Measurement ID may result in:
- No data being tracked
- Data being sent to the wrong analytics property
Step 4: Save the Configuration
What to do:
- Click Save or Update to apply the changes.
What happens next:
- SnapApp embeds the Google Analytics tracking logic into the application
- User interaction data starts flowing to Google Analytics
Why this matters: Changes are not applied until saved. Saving confirms and activates analytics tracking.
What Data is Collected in SnapApp
Once configured, SnapApp tracks and sends the following data to Google Analytics:
- Page views
- User navigation paths
- Click interactions
- Session duration
- General engagement metrics
This data is processed by Google Analytics and made available through reports and dashboards.
Dashboards and Insights
Based on collected analytics data, SnapApp creates dashboards that help visualize:
- User demographics
- Website traffic trends
- Behavior patterns
- Application performance metrics
These dashboards simplify complex data and make it easier for users to understand and act on insights.
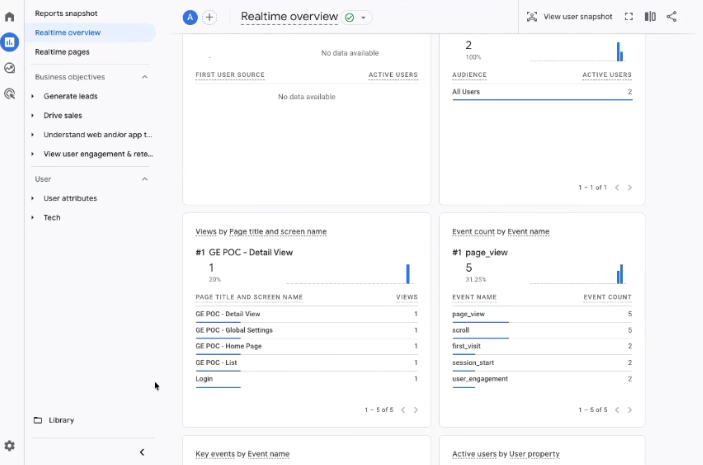
Verification (Optional but Recommended)
After setup, you can verify that analytics is working correctly by:
- Opening Google Analytics
- Navigating to Reports → Realtime
- Interacting with your SnapApp application
- Confirming that activity appears in real-time reports
Thank you for following these steps to configure your SnapApp components effectively.If you have any questions or need further assistance, please reach out to our support team.
For support, email us at snapapp@bluevector.ai